Table Of Contents
- Autodesk Revit to cove.tool
- Before you begin
- Model Prep?
- Custom 3D Views
- Prepping the Viewport
- Filter and Visibility
- Selecting and Objects
- SketchUp to Rhino
- Export as .DWG
- Import to Rhino
- Meshes to Surfaces
- Rhino to Grasshopper
- Launch Grasshopper
- Start a New Project
- Using the Locksolver Function
- Grasshopper to cove.tool
- Before You Begin
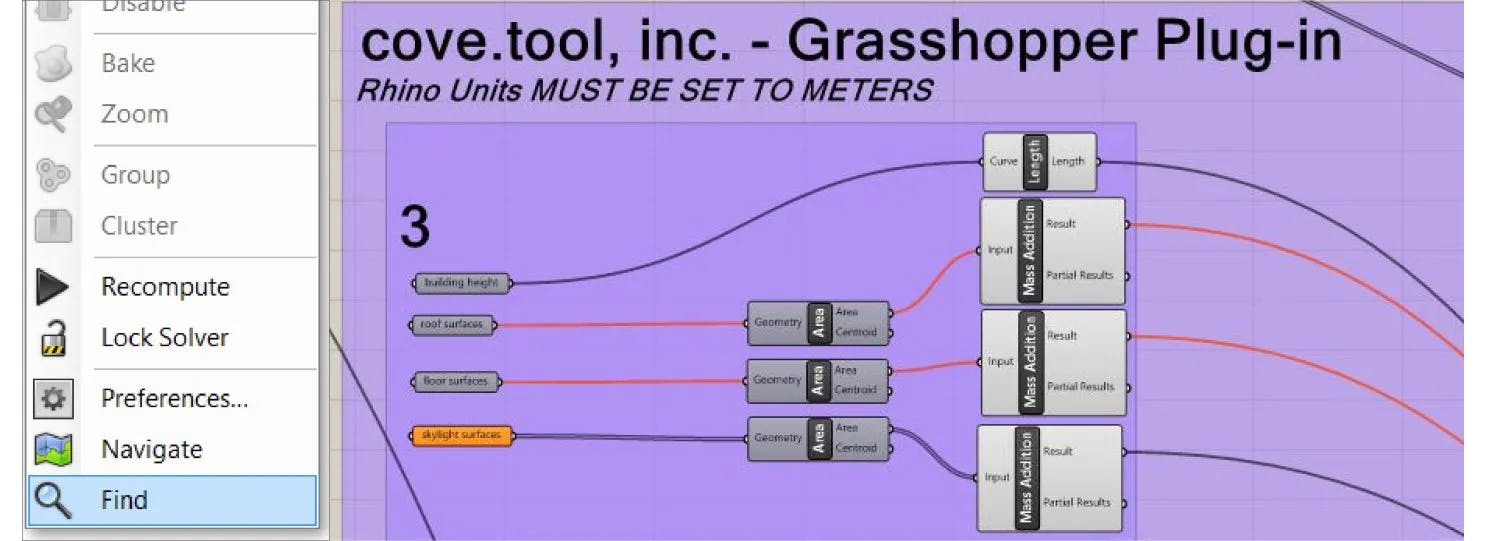
- Building Height
- Roof Surfaces
- Floor Surfaces
- Skylight Surfaces
- Wall Surfaces
- Window Surfaces
Table Of Contents
- Autodesk Revit to cove.tool
- Before you begin
- Model Prep?
- Custom 3D Views
- Prepping the Viewport
- Filter and Visibility
- Selecting and Objects
- SketchUp to Rhino
- Export as .DWG
- Import to Rhino
- Meshes to Surfaces
- Rhino to Grasshopper
- Launch Grasshopper
- Start a New Project
- Using the Locksolver Function
- Grasshopper to cove.tool
- Before You Begin
- Building Height
- Roof Surfaces
- Floor Surfaces
- Skylight Surfaces
- Wall Surfaces
- Window Surfaces

***DOWNLOAD THE PDF VERSION OF THIS ARTICLE***
Autodesk Revit to cove.tool
Before you begin
cove.tool’s modeling software plugins were created to streamline the import of building geometry. With our custom data collector, we find your project, collect the geometry, and export the correct values into the cloud database to run a fast and accurate energy analysis. Because the plugin imports information instantaneously every time you change your geometry, you can reload the project and see the latest update of your building’s performance. Here is how you can use Revit to start a cove.tool project.

Selecting the correct objects to import is important. One thing we are proud of is that our software can detect when these objects are and are not in the correct categories for import selection. This means that no matter what stage your Revit model is in when we want “wall” data the plugin will only take values from wall objects. Because of cove.tool only uses values from objects which directly affect a project’s energy performance (i.e. walls, roof, skylights, floors, and windows) and cuts out miscellaneous objects, it cuts the need for geometry-oriented model prep.
Model Prep?
The Revit plug-in uses 3D views for its selection and data export process. These steps will not impact the building geometry at all; instead, the Revit plug-in will require edits in viewport settings to make seamless data collections. This process has yet to meet a building large or complex enough it couldn’t handle, but here are 4 steps you can take to make sure a geometry import in Revit, from beginning to end, takes 5 minutes or less.
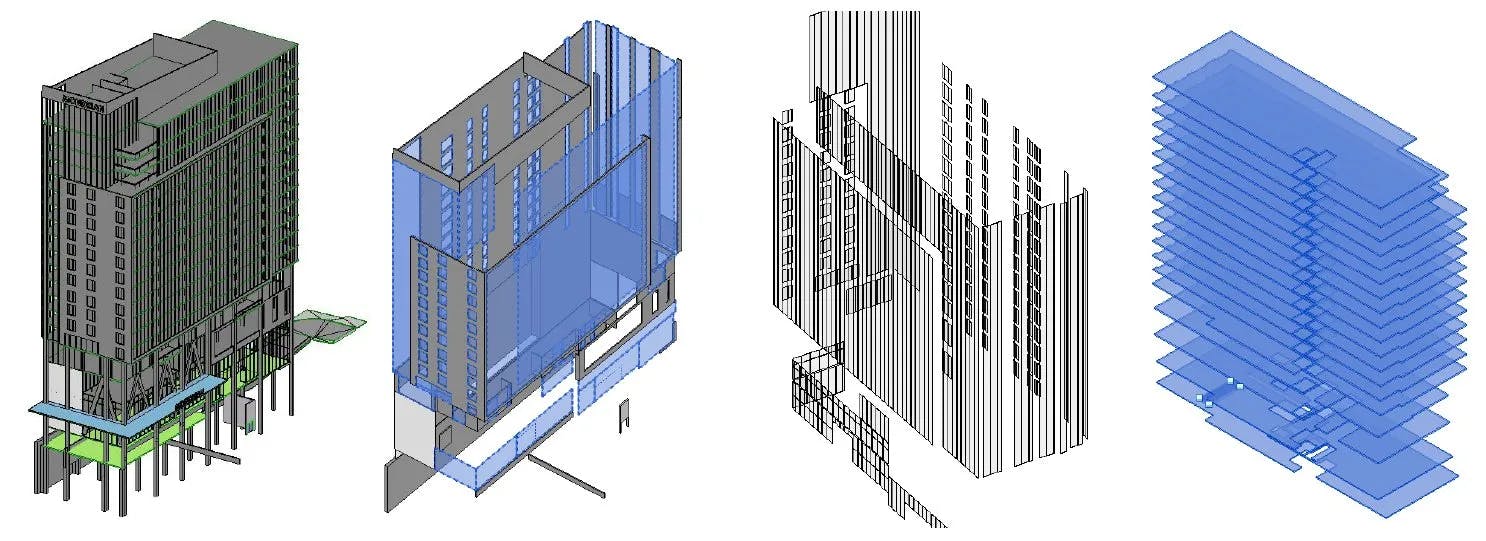
Custom 3D Views
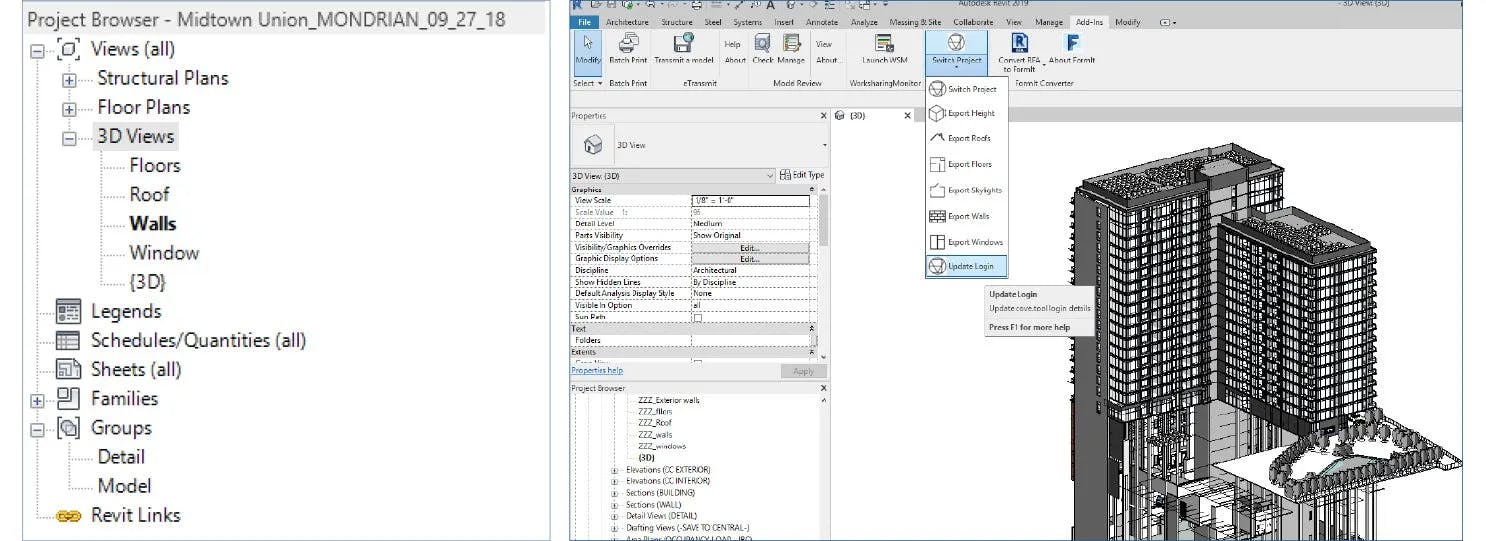
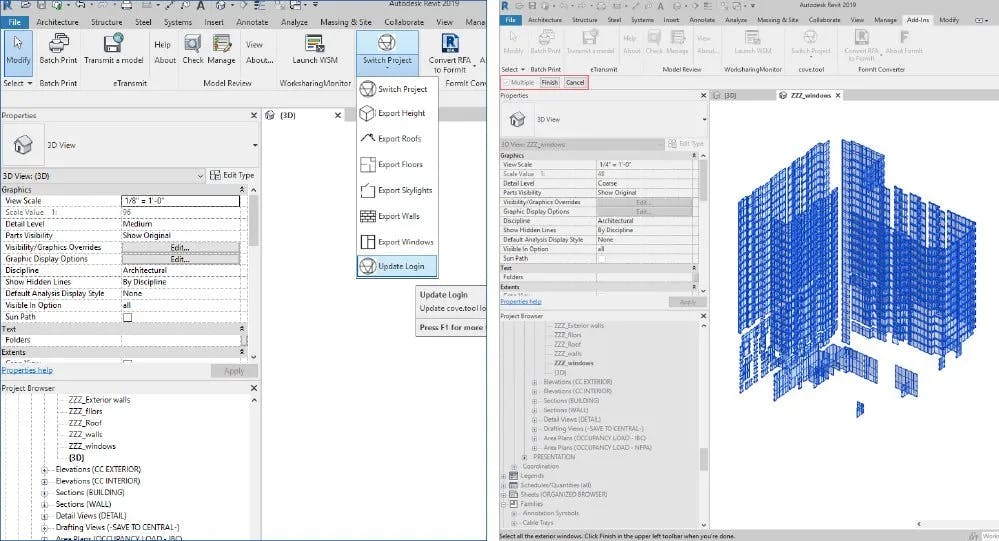
Step 1: Duplicate four 3D Views in your Revit’s Project Browser. Name each view after four of the eight cove.tool categories (Floors, Roofs, Walls, and Windows). These views will remain your standard cove.tool selection windows. As you update your project, these viewports will follow suit and throughout the project’s life, you will be able to go back and forth from Revit and cove.tool to learn about your building’s current energy performance.
Prepping the Viewport
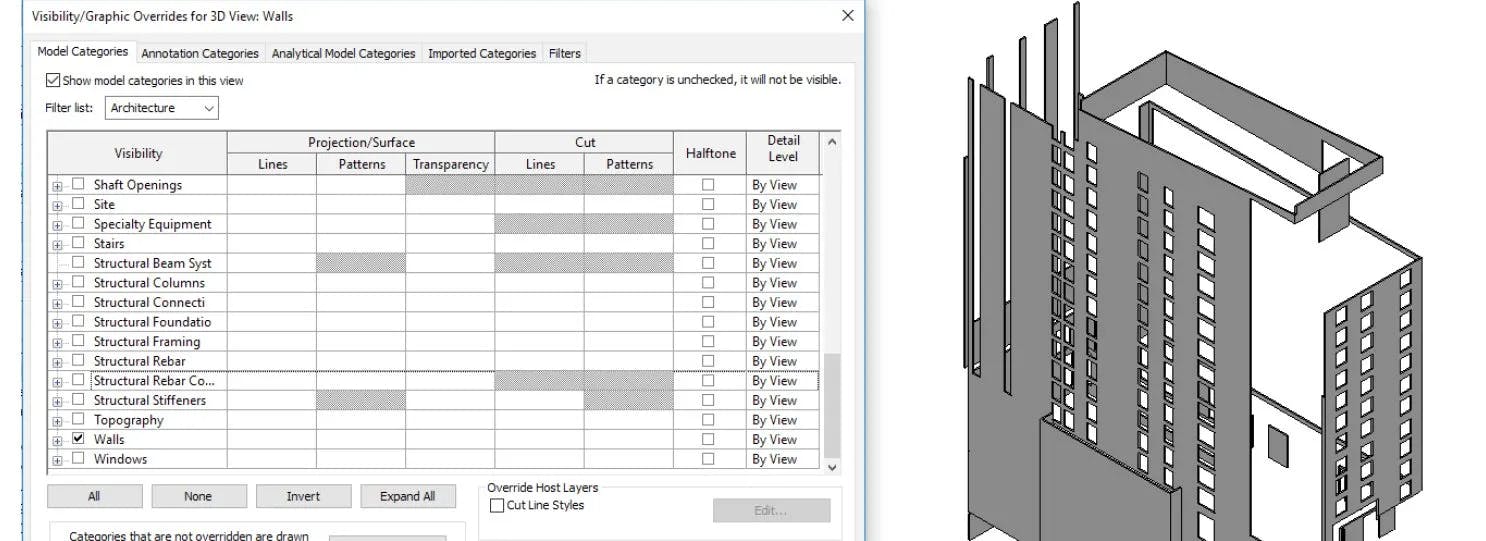
Step 2: Enter any view. In these windows, you will set up views which only show objects in one cove.tool category. Once open go to the VIEW tab at the top of the Revit interface, and select the Visibility/Graphics sub tab to open the Visibility/Graphics Overrides Editor. In the Model Categories tab, deselect all Object Types in the Visibility Column which are not objects you want Cove.tool to import. Ex: A “WALL” import only needs the objects from the “Walls visibility category,” as would ROOFS need from Roofs, FLOORS from Floors, and so on. For categories left checked, deselect the subcategories as they are not relevant to cove.tool and can slow down the geometry export.
Filter and Visibility
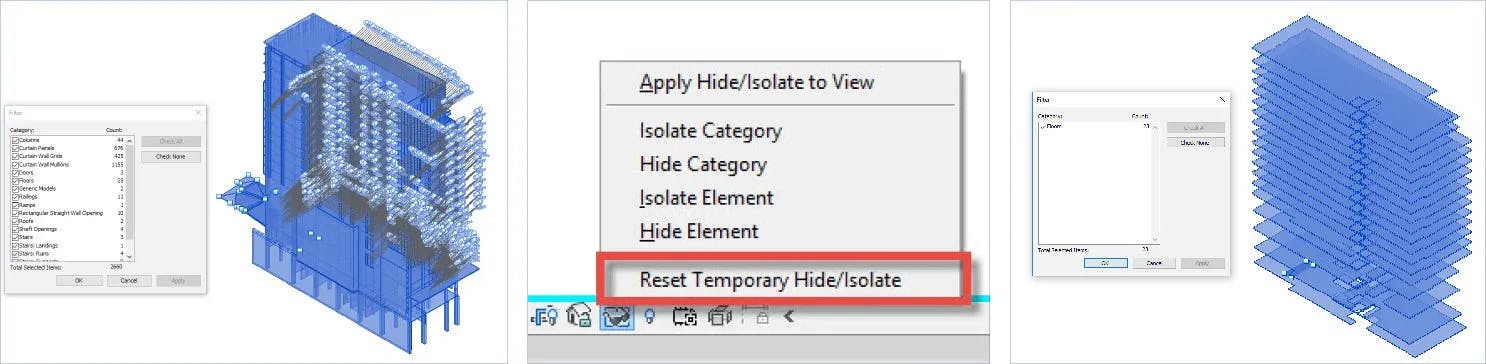
Step 3: Objects which may remain in the view after the Visibility/Graphics change may have to be hidden manually. Jump back and forth using the Selection Filter Tool to identify unwanted stray objects and the Sunglasses “Hide Element” tab to purge these objects from your viewport. Once the Filter tool has been exhausted and a few more undesired objects remain, manually select the objects and Hide the Elements. Use Left Click option like Select “Similar Objects-In Viewport”, to make this step faster. Once complete, Apply Hide/Isolate View and complete steps for the other windows.
Selecting and Objects
Step 4: Now that all your viewports are complete, begin the geometry export process. Log in to your cove.tool account to connect your project to our cloud network. If you haven’t already, start a new project in our web-app so that there is a project to link to when you “Switch Projects” in Revit. Go through each tab/category and select the geometry.One category that may be tricky is the WINDOWS import. Depending on the window type property, a window object may be located in multiple visibility categories. Also, note that the cove.tool WALLS import does not require interior walls, only exterior walls which have an impact on thermal transfer.
——————————————————————————————————–
***FEEL FREE TO DOWNLOAD THE PDF VERSION OF THIS ARTICLE***

SketchUp to Rhino
Export as .DWG
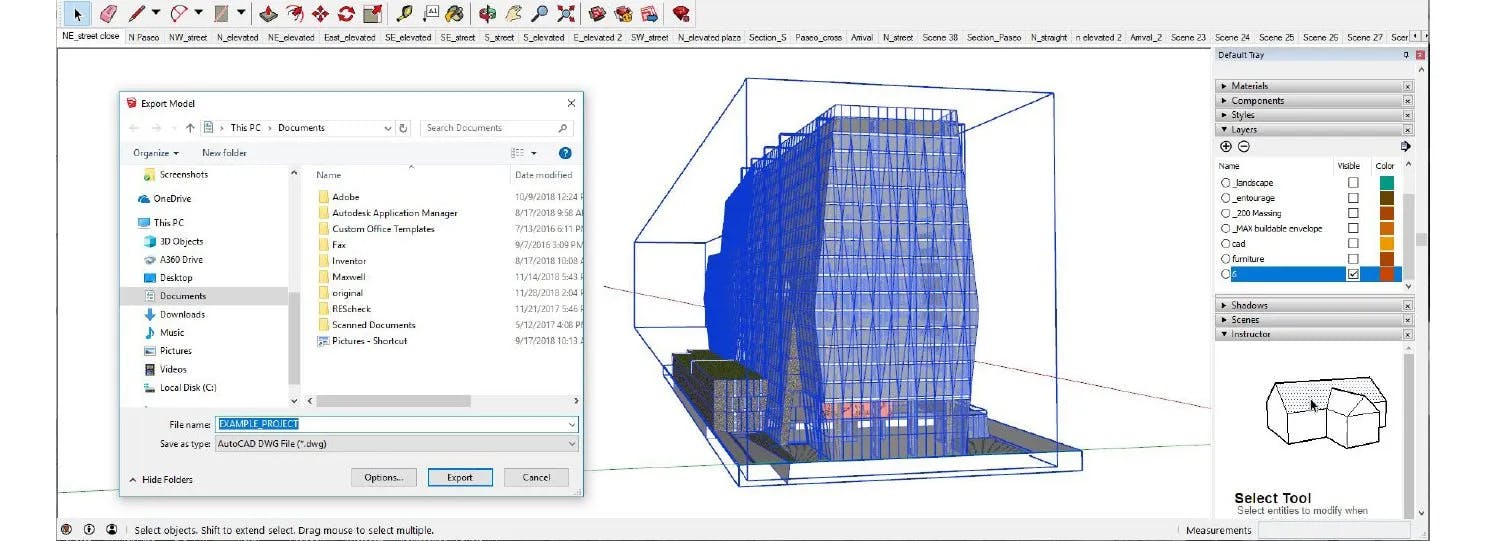
STEP 1: From SketchUp, export your model to a .DWG format. With cove.tool’s current process, you only need your building for the plugin process so context and populating blocks (people, furniture, vegetation, etc.) are unnecessary for the Rhino portion and slow down the exporting process.
Import to Rhino
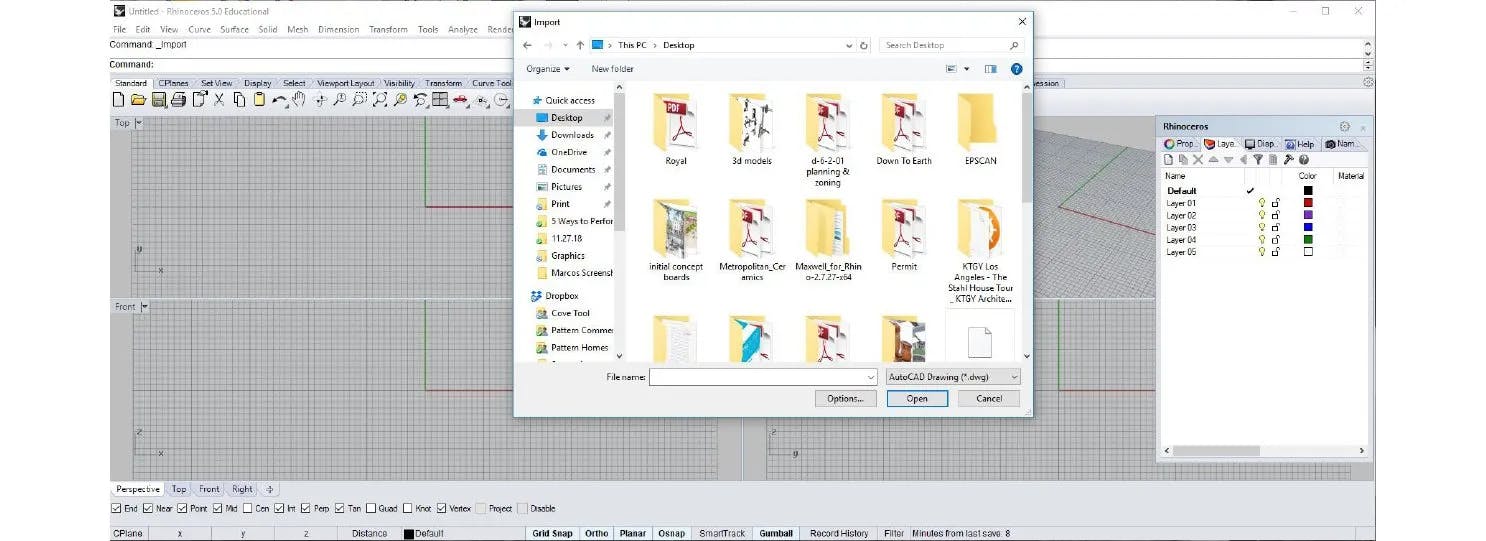
STEP 2: Before importing the .DWG file into Rhino set Rhino units to meters, this will be necessary once inside Grasshopper. Now import the .DWG file into Rhino. Make sure your model is oriented to the correct cardinal directions, you can check this by viewing your model in the “Top View” to see if your north façade is facing project north (top of the screen). This is imported as data collected from the plug-in will be inserted into the correct equation by its cardinal positioning.

Meshes to Surfaces
STEP 3: Once imported from SketchUp, the project geometry will be entirely made of mesh objects. Cove.tool’s grasshopper plug-in will only select single surface objects to export area data. In order to convert mesh objects into single surface objects, use the following two commands. First, “MeshToNurb” to create polysurface copies of the mesh geometries and while still highlighted delete the original mesh-objects. Second use “MergeAllFaces” command to weld many polysurfaces into single-surface objects. Polysurfaces that do not weld into a single surface object can be converted to single surfaces by using the command “Explode”.


Rhino to Grasshopper
Launch Grasshopper
PART A: Use the command “Grasshopper” to launch the app, open the covetool.gh file you should have downloaded earlier from Food4Rhino. Be careful navigating the file. Cove.tool’s grasshopper file was custom engineered to get the exact values from your project model. The entire process is modelled and several tips are placed around the file to keep you on track.
Start a New Project
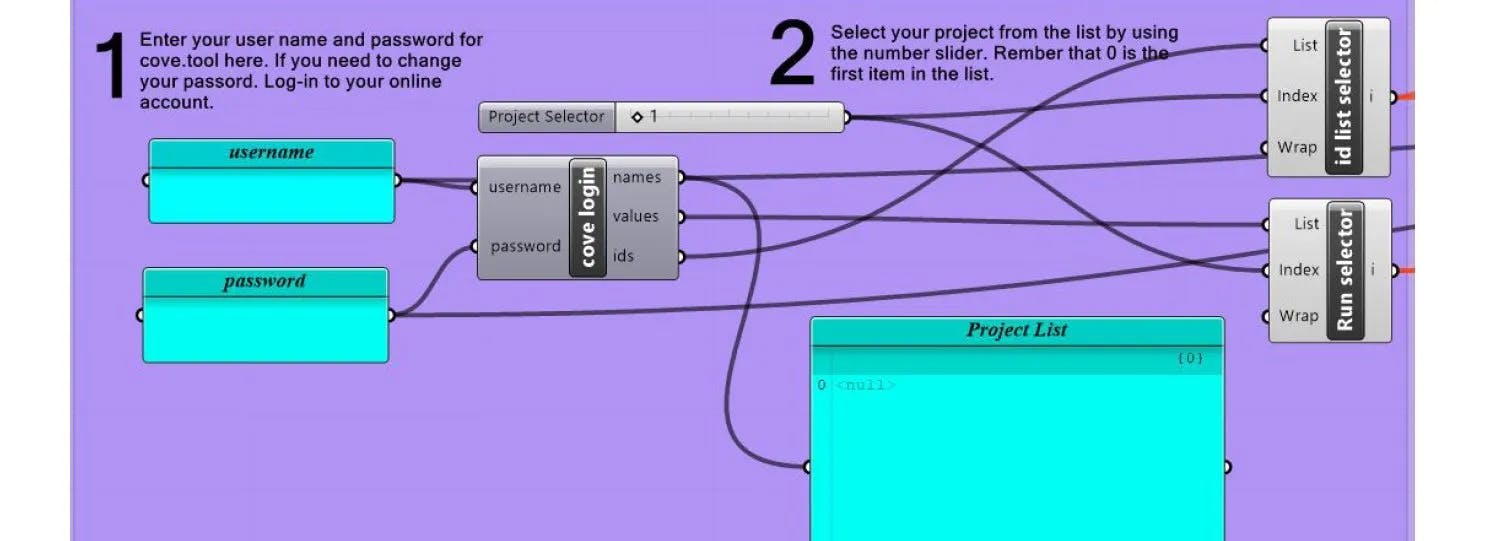
PART B: Inside the Grasshopper file, there are only 3 areas that require your inputs.
Step 1: Fill-in the login and password panels with your cove.tool information. This will link your Rhino project to the cove.tool cloud. Make sure you have started a new project in the cove.tool web app before continuing.
Step 2: Once logged-in, the project list will update to show your cove.tool project history. Using the number that identifies the project you wish to link to the project in cove.tool, correct the project selector to connect.
Using the Locksolver Function
PART C: You are nearly ready to begin the building geometry export process. Before doing any more actions, right-click the Grasshopper plane and activate the “LockSolver.” LockSolver is a Grasshopper tool which temporarily disables Grasshopper’s Solver, in other words, it freezes Grasshopper computing process so while activated any new components, parameters, or inputs added will not run immediately. Grasshopper is infamous for its freezing and crashing, but keeping Lock Solver consistently activated while you work, and only disabling when you are ready for the information to update, you should be fine and the entire process will be quick.

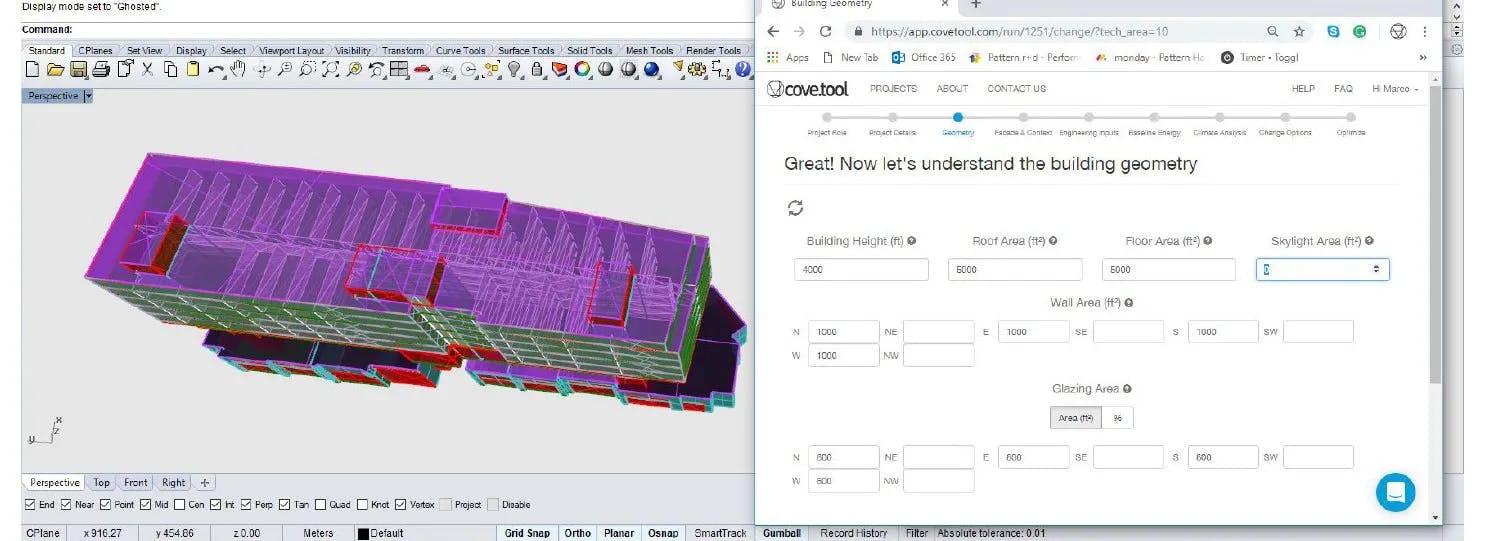
Grasshopper to cove.tool
Before You Begin
Now you are ready to begin the geometry import. To begin exporting geometry create Breps for the following pills, “roof surfaces, floor surfaces, skylight surfaces, opaque wall surfaces, and window surfaces.” Create Breps by double-clicking the grasshopper plane and typing “Brep” (aka Boundary Representation). Each export is unique and the following will explore tips and challenges for each category. Once all Breps are completed and lines connected, disable the LockSolver and jump to the cove.tool web app to see your results.
Building Height
PART 1: Obtain building height by right-clicking the building height pill and selecting the “Set one Line” prompt. Jumping back to your Rhino model, begin a line from the lowest point of your model and continue vertically-locked to the highest point in your model. The measurement will be automatically recorded and once the “LockSolver” is disabled, the information will be updated in your cove.tool project summary.
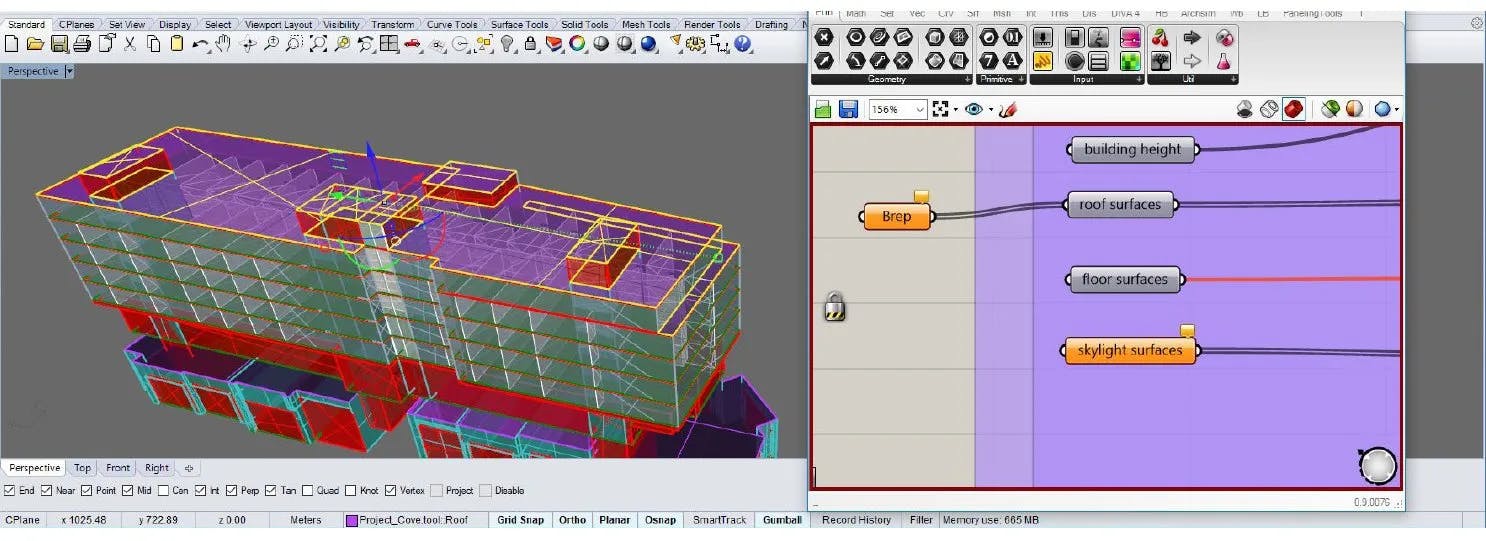
Roof Surfaces
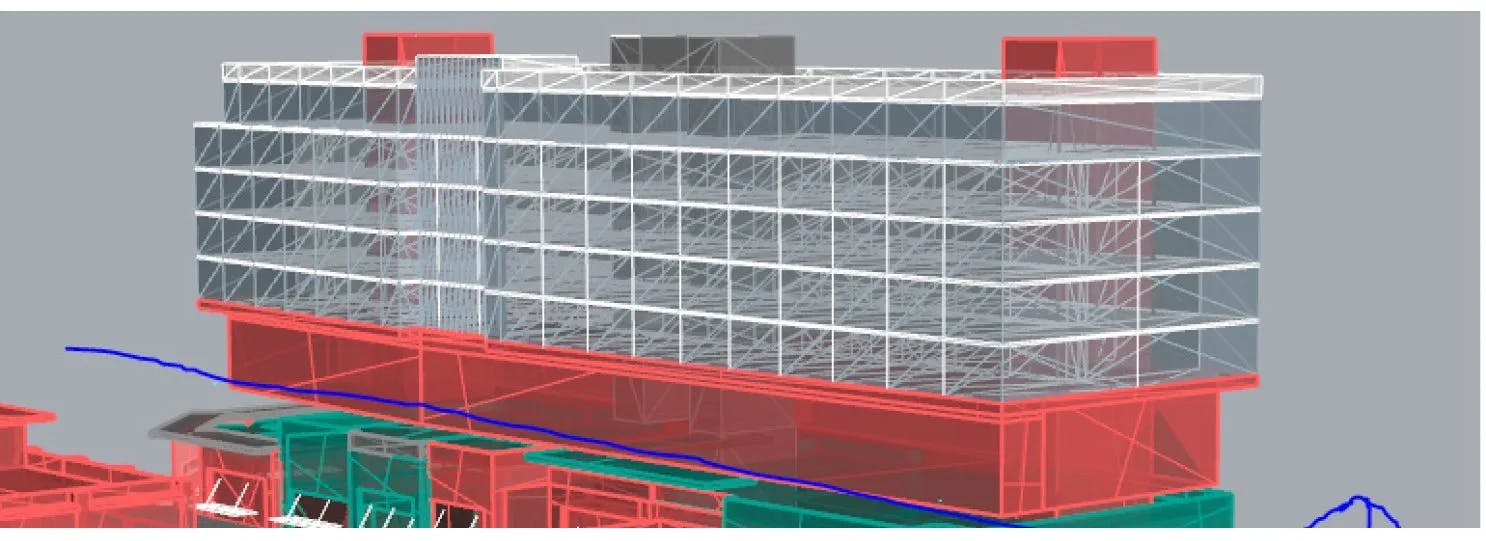
PART 2: Using a new Brep pill, right-click the Brep and select the “Set Multiple Breps” prompt. Back in Rhino, select the single surface objects that best illustrate the combined surface area that entails your projects entire roof surface area. This includes all areas that are exterior and seal the areas below them, do not include cantilevers as they have no energy impact on a building. Once selected, back in grasshopper connect the Brep pill to the roof surface pill with a wire to complete the import.
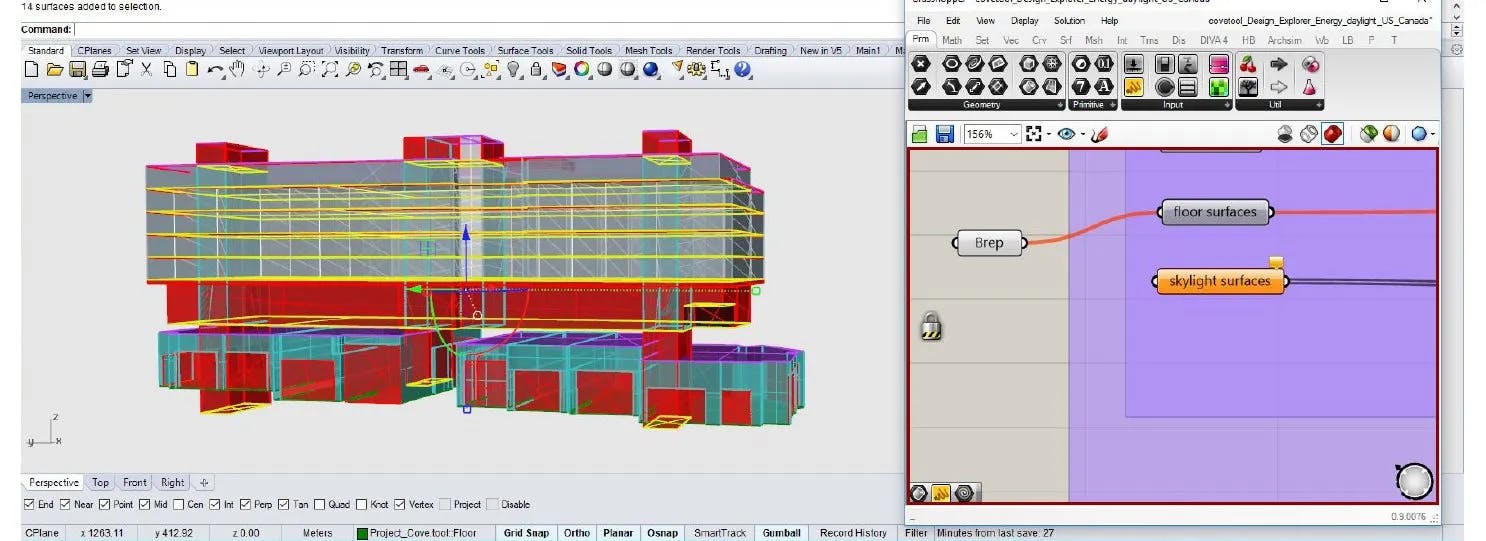
Floor Surfaces
PART 3: Repeat the same steps in roof surfaces for floor surfaces with a new Brep. However you modeled the floors (with thickness, or not) throughout your project, the only surfaces you should select are planes that best illustrate the combined floor surface area or your entire project. Be wary of selecting multiple surfaces on the same plane, as they may double-log surface areas and will result in unrealistic calculations and results in your cove.tool report.
Skylight Surfaces
PART 4: Repeat the same steps in roof surfaces for skylight surfaces with a new Brep. Not all projects have skylights, so it is ok to leave this category empty by not creating/connecting a Brep. This may give you an error prompt in the Grasshopper code, but will not affect the rest of the data exports, so there is no need to worry. Go into the cove.tool web app and manually enter zero in this category.
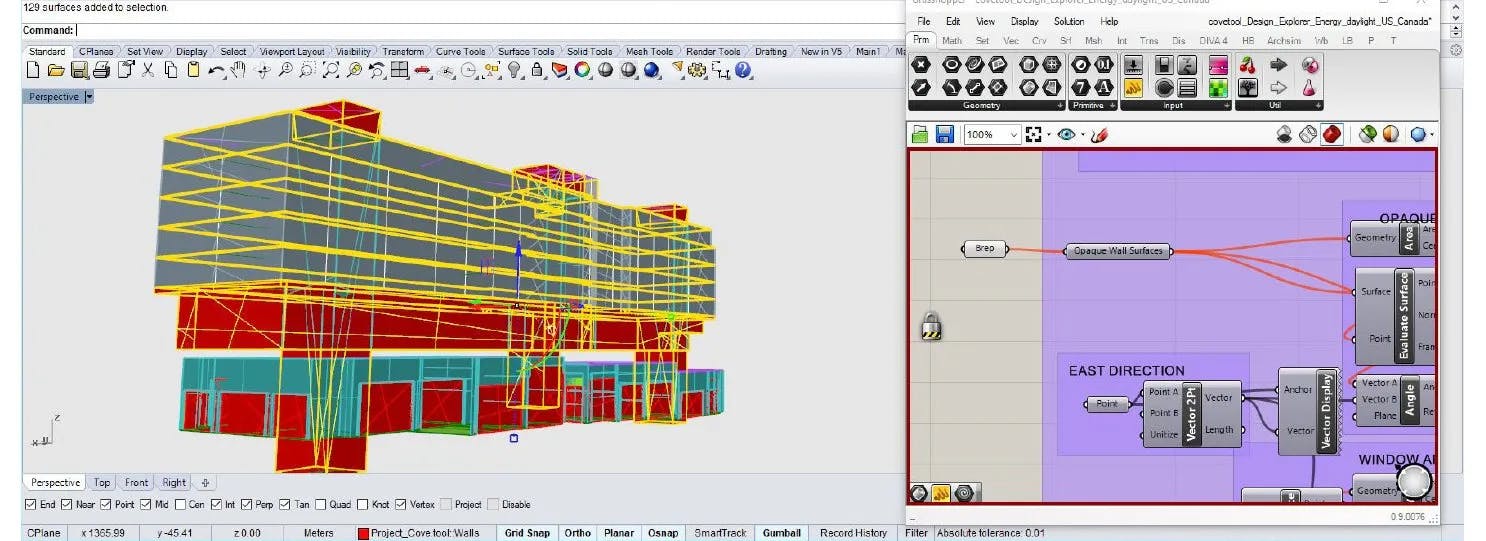
Wall Surfaces
PART 5: Repeat the same steps in roof surfaces for opaque wall surfaces with a new Brep. Because cove.tool is an early stage energy modeling software the only data we need from your building geometry are the areas in which Heat Transfer occurs. Thus when selecting walls for the cove.tool plug-in, only exterior walls should be selected, everything interior is unnecessary for the types of energy analysis and results cove.tool will generate. If you have a project that has Fins or Overhangs, those do not need to be exported as they have their own page in the cove.tool app that are manually recorded.
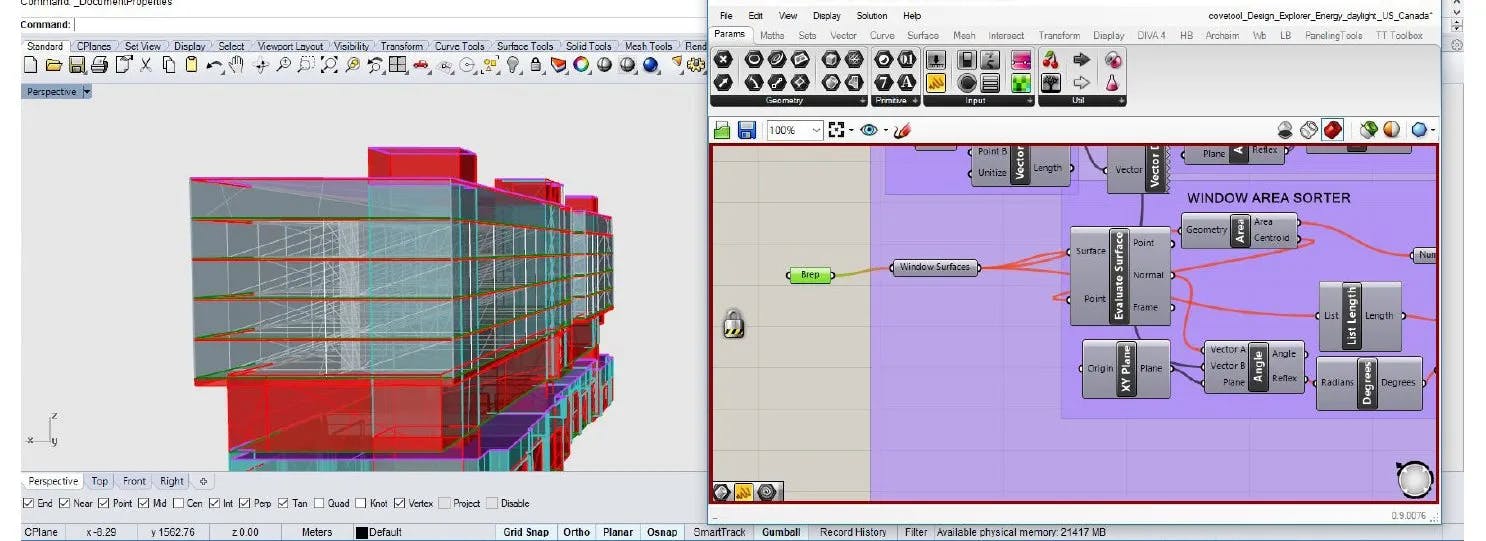
Window Surfaces
PART 6: Repeat the same steps in roof surfaces for window surfaces with a new Brep. Similar to Opaque wall surfaces, the window surface selection only pertains to areas on the exterior face of the project. Also, mullions would, in theory, be included in the window selection process and not in the wall surface category, however because of their general size they tend to be minimal blips in the energy simulation results especially for an early-stage energy modeling software, therefore are not necessary to export to cove.tool.
——————————————————————————————————–
***FEEL FREE TO DOWNLOAD THE PDF VERSION OF THIS ARTICLE***